So instead of boat plans and following the Christopher Cunningham book as my guide, I find myself sitting on a 8" x 2" plank, balanced in the middle over a batten and taking various measurements 'off myself'. At least it should end up a truly custom fit. With reference points to my heals, feet, 'sit bones', back etc. I transfer these measurements to the two gunwales. The overall length of the kayak if meant to be three arm spans, (or 3 times my height). This would take the kayak to 17'6", but looking at the length of my garage workshop, I opt for a straight 17'. The balance point of the kayak is worked out slightly aft of midpoint to ensure good tracking in the water and using various 'measurement rules' the rest of the deck beams and the twenty four rib positions are marked out on the 75mm x 22mm yellow cedar.
Time for morticing. To start with I cut forty eight, blind 8mm mortices in the bottom of the gunwales. I use my new mortice machine for this mounted on my workbench which I run along the length of the garage on wheels. These will later receive the steamed ribs.
The next mortices are going to be more difficult as although through mortices, they need to be cut through the sides of the gunwales at exactly 73 degrees. Once the gunwales are splayed outwards at the top, this angle will mean the deck beam joints are back on the horizontal. To start with I think about making up a jig for the morticer. I soon realise it will be easier by hand. Again following the book, I make up a jig to get three holes bored through at the correct angle in all twenty two of this next lot of side mortices. The jig works fine and I spend several hours squaring the mortices up by hand.
I have already cut the temporary middle and end plywood formers, so having first cut a bevel along the top edge I fit the gunwales to these and I have the very start of a kayak shape. The width of the kayak at its widest point is determined by the width of your hips plus two fists (there are some optional variations on this, depending upon the characteristics one is looking for in the kayak). For this initial set-up this is set at 23" but I decide to have another look at this before I finally commit myself as first impressions suggest this may be a little wide. There is something really intriguing around making something as three dimensional as a boat using measurements determined by 'rules' and body shape, as opposed to a blue print and offsets. Very different from my previous two home builds.
The 73 degree angle which I seem to be working with in every stage of the build is already working well as it forces the gunwales up at both ends to a really eye catching sheer line. This is further helped by the curve cut in the ends if the gunwales at both ends. It has just moved from two 3 x 2's into the start of a kayak and the workshop has the pleasant smell of yellow cedar being worked.
Monday, 26 November 2012
Sunday, 11 November 2012
Time for another home built boat
So this time the project is a Greenland Skin on Frame Kayak following the guidance in Christopher Cunningham's book on the subject and plenty of other research over the internet. My other boats have involved epoxy and detailed boat plans. In contrast this time I will be working with trunnels, artificial sinew and no design plans. This will be a new experience and one which I am looking forward to.
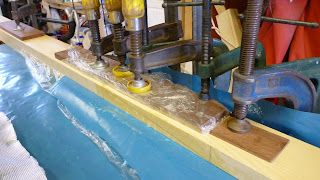
The only epoxy job in the entire build, scarfing planks together to get the length I need.
I am working with yellow cedar and plan to use green oak to form the many ribs of this kayak. The dimensions really will be made to measure and they will all be calculated in the traditional way using Anthropometric measurements based on me!
I have already spent some time researching the technique and sourcing materials and a few additional tools. It is strange how one thing can lead to another and having found a new really good weekly podcast, I came across the download on skin on frame, an interview which Dan does with Corey Freeman of skin boats. Next thing I know I have all the non timber materials, coating, fabric and sinew etc. on route to England from the states.
My garage is now turned into a workshop and the timber has also arrived. The yellow cedar releases a really nice smell as it is worked (much nicer than drying epoxy and better for me I guess).
I will be interested to hear from anyone else out there who has a similar project on the go. Anyway, happy building and another boat in the making to add to the fleet.
In between all this I intend to get some winter sailing in and some kayaking (so I will include a few other pictures along the way)!
Subscribe to:
Comments (Atom)


